The camera automatically opens the Live screen when you access the camera for the first time. Use this screen to change image settings, to use the softbuttons, to open the Setup Menu or to access the password-protected Admin Menu.
The Elements of the Live Screen
Hold your mouse over the elements of the user interface to see the bubble help. Click on the element to go to the description.
Shows the camera name as set in the Quick Installation wizard or in the Ethernet Interface dialog in the Camera name field.
Open Help
Opens the online help for the current screen or dialog. If no help page is available, the Help page will be displayed.
Camera Information
Displays information on the hardware, software and the most important settings of the camera.
Screens of the Camera
Name
Element
Description
Live
The Live screen of the MOBOTIX camera displays the current images of the camera.
Use the dropdown menus to access certain functions of the image controls and the camera administration or open the Setup Menu to see links to all image and event control dialogs.
The Admin Menu (password-protected) contains all dialogs for configuring the camera.
Player
Use the Player screen to view and download the events stored in the internal or the external image storage of the camera.
Use the MultiView screen to combine several cameras in different patterns and to assign special functions (highlighting, focus on alarm, ...) for the individual cameras.
The Guest screen allows viewing the camera's live image, setting the frame rate within the preset limits and accessing the Live screen by clicking on the Menu link at the bottom of the page.
Select the desired frame rate for the Live screen.
Please note that the frame rate depends to a large degree on the bandwidth of the transmission path, the selected resolution and the video codec used (MxPEG or Motion JPEG).
Use the image control functions to adjust the Live screen to your preferences:
Camera Selection
Select the right, the left or both image sensors, or a picture-in-picture (RiL or LiR) display (only available in dual-lens models).
Display Mode
Depending on the camera model, you can use this option to display either different picture-in-picture views or various views of corrected (i.e. undistorted) images (see General Image Settings > Display Mode).
This command assists when configuring a camera for the first time.
Depending on where the camera has been mounted, select Wall or Ceiling.
Click with your mouse into the live image to turn the image into the desired direction.
Depending on the camera model, select Set Focus or Set North.
Load View
Select the stored view you would like to see. A view is the combination of a direction and a zoom factor.
Save View
Select the number of a view for which you would like to store the current direction and the zoom factor.
Auto Mode
This feature allows automatically moving between stored positions.
Jump N/E/S/W: Switches between the North, East, South and West views. Corresponds to the Auto Move on softbutton.
Surround Clockwise: Automatically moves through the four defined views as defined by the Set Focus command. Corresponds to the Auto Move on softbutton.
Pan Right: Turns the virtual camera slowly in clockwise direction.
Pan Left: Turns the virtual camera slowly in counter-clockwise direction.
Views 1-15: Automatically loads the first 15 views that have been stored using the Save View command, one after the other.
off: Deactivates the Auto Mode. Corresponds to the Auto Move off softbutton.
--Recording---------------
Recording
Use this command to activate the recording features. In addition, you can select some predefined settings for continuous recording and event recording in this section. The Add Video Motion Window and Replace Video Motion Window allows setting/replacing a rectangle created in the live image by [Shift]-click, click as video motion window, respectively.
--Image-----------------------
Image Size
Select the desired image size or draw a rectangle ([Shift]-click, then click) in the camera's live image, then use Define Custom Image Size to create an image with the dimensions of the rectangle.
Image quality
Sets the level of detail that is used when reading the image sensor.
Brightness
Select the desired image brightness.
Exposure Control
Select either the vPTZ Exposure Mode or the Recording Exposure Mode. The camera displays more options if you have selected the Recording Exposure Mode. For one thing, you can use one of the predefined exposure windows to adjust the exposure control. Furthermore, you can use a [Shift]-click, click to define a rectangle in the live image and to use it as the new exposure window (Replace Exposure Windows) or to add it to the existing exposure windows (Add Exposure Window).
Color Saturation
Select the desired color saturation.
Backlight Correction
Select the desired correction level for a backlight situation in order to brighten dark image areas.
Sharpness
Select the desired sharpness of the images.
JPEG Quality
Select the desired quality of the generated images.
--Audio----------------------
Speaker Volume
This parameter sets the volume of the camera speaker.
Microphone Sensitivity
This parameter sets the sensitivity of the camera microphone.
--Web Technology------------
Browser
Select how the browser gets the images from the camera: Internet Explorer:JavaScript (default), Java, ActiveX (only for Windows) Netscape/Mozilla/Firefox:Server Push (default), JavaScript
--Configuration--------------
Managing Settings
Use this function to load the image factory defaults, restore the image settings from flash, and to store the complete configuration (requires administrative access).
Note: Depending on the camera model, some of the listed features may not be available.
Opens the Administration menu of the MOBOTIX camera, allowing you to change the most important system settings. You need a user name and password of an admins user group (Users and Passwords dialog) to access this menu.
Setup Menu
Opens the Setup menu with its dialogs for changing the image and event settings.
Arm & Record:
(Arm the camera and start recording)
This Wizard activates the camera microphone and the audio output on the computer (only when using Internet Explorer on Windows computers).
MxPEG on
(Activates the MxPEG video codec)
This softbutton activates the MxPEG video codec, which guarantees fast transmission of video and audio data while using as little bandwidth as possible.
MxPEG off
(Deactivates the MxPEG video codec)
This softbutton deactivates the MxPEG video codec in order to produce JPEG images with the best possible quality. This is the preferred setting for webcam applications.
High Quality
(High quality images)
Uses the highest possible quality when reading the image sensor.
Normal Quality
(Normal quality images)
Uses the preselected default quality when reading the image sensor.
This softbutton will prompt the camera to blink with its camera LEDs for five seconds.
Play Sound:
(Play back a sound on the camera speaker)
This softbutton plays back a sound on the camera speaker. For additional information on recording and using your own audio messages, see the Manage Audio Messages help page.
Play Last Event:
(Plays back the last event)
Plays back the last event recorded by the camera.
Event List
(Event list)
Click on this button to display the Event List dialog. This dialog displays a list with the last 20 events with the corresponding navigation links.
Click on one event link to show the corresponding event image in the player or select a date and time to list the events of that point in time.
Multiwatcher
The Multiwatcher displays the live/event images of this and other MOBOTIX cameras via a "proxy camera". This means that only one camera needs to be accessible from outside of the network and this camera allows you to see live images and event lists of this and other cameras within the network.
Zoom buttons
Use these buttons to control the digital zoom and the panning functions for moving the visible area within a zoomed image:
1x Zoom
Switches the digital zoom off and returns to the regular camera view.
Zoom +
Increases the zoom level (i.e. enlarges the size of the displayed objects).
Zoom -
Reduces the zoom level (i.e. reduces the size of the displayed objects).
The image area shows the live images of the camera as well as logos, texts and symbols of the camera. In addition, you may choose from the following options:
If the digital zoom has been activated, you can move the visible image area by clicking with the mouse (panning); rolling the mouse wheel changes the zoom level of the image area.
The functions for managing image files, logo definitions and creating image profiles will enable you to use graphic files stored on the camera or from other URLs as logos with transparent areas or as watermark in every image of the camera. Using several logos will allow you to display these logos as banners at a definable interval.
If you are using Time Tables, you may also activate/deactivate the logos in a scheduled manner.
Open the Text and Display Settings dialog to change the symbols that are displayed at the bottom of the image area.
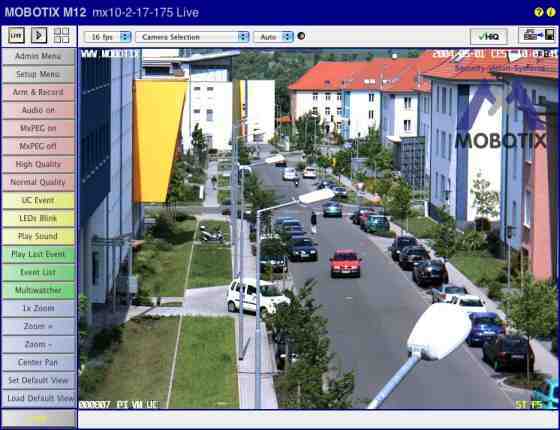
The event symbols in the lower left corner of the image area show the event number (in this case 000807) and the symbols for the activated sensors at the time of the recording. In this image, PI (PIR sensor), VM (Video Motion) and UC (User Click) had been activated.
If an event occurs, the corresponding symbol (e.g. VM) is displayed in red.
Open the Text and Display Settings dialog to change the event symbols that are displayed at the bottom of the image area.
The yellow symbols in the lower right corner of the image area show all actions that are active on the camera. In this case, ST (Storage) and REC (File Server storage) are active.
If one of the actions is carried out, it is displayed in blue (e.g. ST); a failed action is shown in red (e.g. FS).
Deactivated messages are shown in gray (e.g. EM) when setting Messaging > Enable Message Profile to off or when using Time Tables to deactivate the messages).
If a Time Table profile has been selected in General Event Settings> Arming to activate or deactivate the camera, off is appended to the displayed action symbols.
Caution:
If General Events> Arming has been set to off, event/action symbols and error messages are not displayed in the image.
For failed actions, an error message will appear above the symbols. Open the Text and Display Settings dialog to deactivate the error messages in the image.
The image programs are selected using the pull-down lists above the camera's live image (Quick Controls) in the browser. These programs adjust the relevant parameters of the MOBOTIX camera to the application scenario; any basic configuration should thus begin by selecting one of the image programs.
In a webcam scenario, for example, moving objects can become blurred when illumination fades, i.e. the camera can use longer exposure times when the scene gets darker so as to provide images with good exposure for as long as possible.
If fast images are required, the camera should use a maximum (longest) exposure time of 1/60s in order to obtain a high frame rate. Likewise, the camera should use the MxPEG codec instead of the JPEG codec, since MxPEG will only transfer the changed portions of the image, resulting in higher image rates and reduced network loads.
Note:
In order to check or change the settings performed by the different image programs, open the corresponding dialogs in the Setup Menu.
Selectable Image Programs of the MOBOTIX Camera
Fast:
This image program prepares the camera for delivering live images as fast as possible. This means that the image quality is set to Fast, the camera will use the MxPEG video codec, JPEG quality is set to 40% and the maximum exposure time is set to 1/60s. Please note that the highest image rates will only be reached using either Internet Explorer on Windows computers with installed MxPEG ActiveX plug-in or MxControlCenter.
Security Application:
This is the preferred image program for security applications. It uses Normalimage quality, the MxPEG codec, a JPEG quality of 60%, a maximum exposure time of 1/5s and the exposure program-2 to avoid blurred rendering of moving objects as much as possible when the illumination decreases.
Quality:
This image program constitutes a good compromise between high-quality and fast images as illumination decreases. It uses Normalimage quality, the MxPEG codec, a JPEG quality of 60% and a maximum exposure time of 1/30s.
High Quality:
This image program puts higher priority on high image quality even when illumination decreases. It uses Fastimage quality, the MxPEG codec, JPEG quality is set to 40% and the maximum exposure time is set to 1/60s. By using the +1image program, moving objects may shown a little blurriness when illumination gets lower, but image quality is better.
Webcam:
Image quality is the key factor for webcam applications. This image program hence uses Highimage quality, the JPEG codec for creating full JPEG images with a JPEG quality of 80%. The other settings (Night Improvement: Off, maximum exposure time: 1/1s, minimum average brightnessOff and the image program+2) allow generating sufficiently bright images for as long as possible; even though the longer exposure times may lead to moving objects that are blurred.
The MxPEG ActiveX Plug-in for Internet Explorer
If you are using Internet Explorer (from version 5.5) on a Windows computer (from Windows 2000), you can use the MxPEG ActiveX plug-in for viewing the live camera images. This plug-in allows you to combine the advantages of MxPEG with the browser-based user interface:
Lower bandwidth requirements due to MxPEG video compression
Smooth movements in the video stream thanks to high frame rates
Audio channel of the camera available on the local computer (not for Web or Basic models)
Additional scaling functions in the browser
Panning (moving the visible image area within the full image) with activated digital zoom by clicking in the image.
Note:
If fast movements occur in the image, you may see tiles in the image if MxPEG is activated. If you prefer better image quality, you should deactivate MxPEG as described in High Resolution and Quality.
Make sure that the following prerequisites are fulfilled if you intend to use the MxPEG ActiveX plug-in:
MOBOTIX camera model IT or higher
Windows computer from Windows 2000
Installed Internet Explorer from Version 5.5
Administrator or Power User access on the local computer (for installing the plug-in)
Suitable security settings in Internet Explorer to install and to execute ActiveX plug-ins. In Internet Explorer, open Tools > Internet Options > Security (tab) and make sure that the following settings are active for the current security level:
Execute ActiveX controls that are safe for scripting:Activate or Prompt
Execute ActiveX controls and plug-ins:Activate or Prompt
Download signed ActiveX controls:Activate or Prompt
Start Internet Explorer and enter the address of a MOBOTIX camera (from software version 2.0).
Open the image controls, select the Browser option and set ActiveX as value.
You will be asked if you would like to accept the installation of the signed ActiveX plug-in. Click OK to install the plug-in.
Click on the MxPEG on button on the user interface or activate MxPEG in the JPEG Settings dialog to use the advantages of MxPEG video encoding.
Notes:
Right-click in the image area to check if the ActiveX plug-in is running. You should now see the context menu explained in the Options of the MxPEG ActiveX Plug-in section, not the standard context menu of Internet Explorer.
If you have completely closed Internet Explorer, you will need to restart the plug-in the next time you would like to access the camera by again selecting the Browser and ActiveX options in the image controls.
Options of the MxPEG ActiveX Plug-in
If the MxPEG ActiveX plug-in has been installed, right-clicking the image will display a context menu with the following options:
Option
Values
Description
Digital zoom
1x / 2x / 4x
Center Pan
Set Default View
Load Default View
Use these options to control the digital zoom and the panning functions for moving the visible section within a zoomed image. The functions are the same as for the zoom buttons.
Scale image
0.5x / 1x / 2x
Scales the image of the ActiveX plug-in to the desired size.
Audio
-
Activate this option to listen to the audio channel of the camera.
An error message will alert you if the camera's microphone is deactivated. If this is the case, open the Loudspeaker and Microphone dialog and activate the microphone.
Change access level
-
Changes the access level used by the ActiveX plug-in to access the camera. User access can use all functions of the ActiveX plug-in, Guest disables the audio functions and the zoom controls.
If a password has been assigned for the user or the guest level, the plug-in will again ask for login credentials to access the camera. This authorization is required for security reasons and cannot be circumvented.
About MxPEG ActiveX
-
Displays information about the version of the MxPEG ActiveX plug-in.
The Best Frame Rate
Depending on the camera application (e.g. bandwidth of the data connection), the frame rate requirements may vary greatly.
Fast Images
For security applications that require fast images, you should use a Windows computer (from Windows 2000) and Internet Explorer (from version 5.5) in conjunction with the MxPEG ActiveX plug-in or the MxControlCenter for viewing the live camera images. Furthermore, you should provide a data link with sufficient bandwidth for the camera's images.
Set the following parameters to the values listed below:
Right-click in the image area (this will show the context menu described in Options of the MxPEG ActiveX plug-in) and select the Scale image > 2x option.
Click on the MxPEG off button on the user interface or deactivate MxPEG in the JPEG Settings dialog.
Adjust the frame rate to the other factors of the application (especially the available bandwidth) and to your preferences:
The Focusing Aid of the Camera
This feature provides a visual aid for properly setting the focus of a MOBOTIX camera lens. The focusing aid is very useful when focusing the lens of a MOBOTIX D12, D22M or when exchanging a MOBOTIX standard lens against a tele lens (for example of a MOBOTIX M22M).
To activate the focusing aid, select the Focusing Aid Quick Control and set the value to Enable; the focusing aid will be displayed in the live window. The camera displays a rectangle with a white and black border. This is the image area used by the camera to determine the best focus of the lens (focusing window). In addition, the camera shows a green bar. This bar shows the best focus value obtained in the focusing window so far. When changing the focus of the lens, the green bar grows as the focus improves. If the focus decreases again, a red bar appears. The focus of the lens is set to the best value if the red bar covers as much as possible of the green bar or the green bar disappears at all. It may happen that you cannot find a setting where the green bar is fully covered. The focus of the lens has been set to the best position if the red bar covers as much of the green bar as possible.
Store to Flash
Using the controls of the Live screen to adjust the camera configuration will keep these changes until the next reboot of the camera, it will not automatically store them permanently. If you have administrative access to the camera, you should store the current configuration into flash memory.